Lies of P has an extensive number of bosses, 25 to be exact! If you’re stuck on one particular boss and keep dying, here’s a guide you might want to pay attention to. This souls-like Pinocchio game is impressive as it is deadly, making its boss battles even more complex and challenging. But as always, we’re here to help.
Here’s a complete guide to all Lies of P bosses, listed in the order you’ll encounter them in the game.
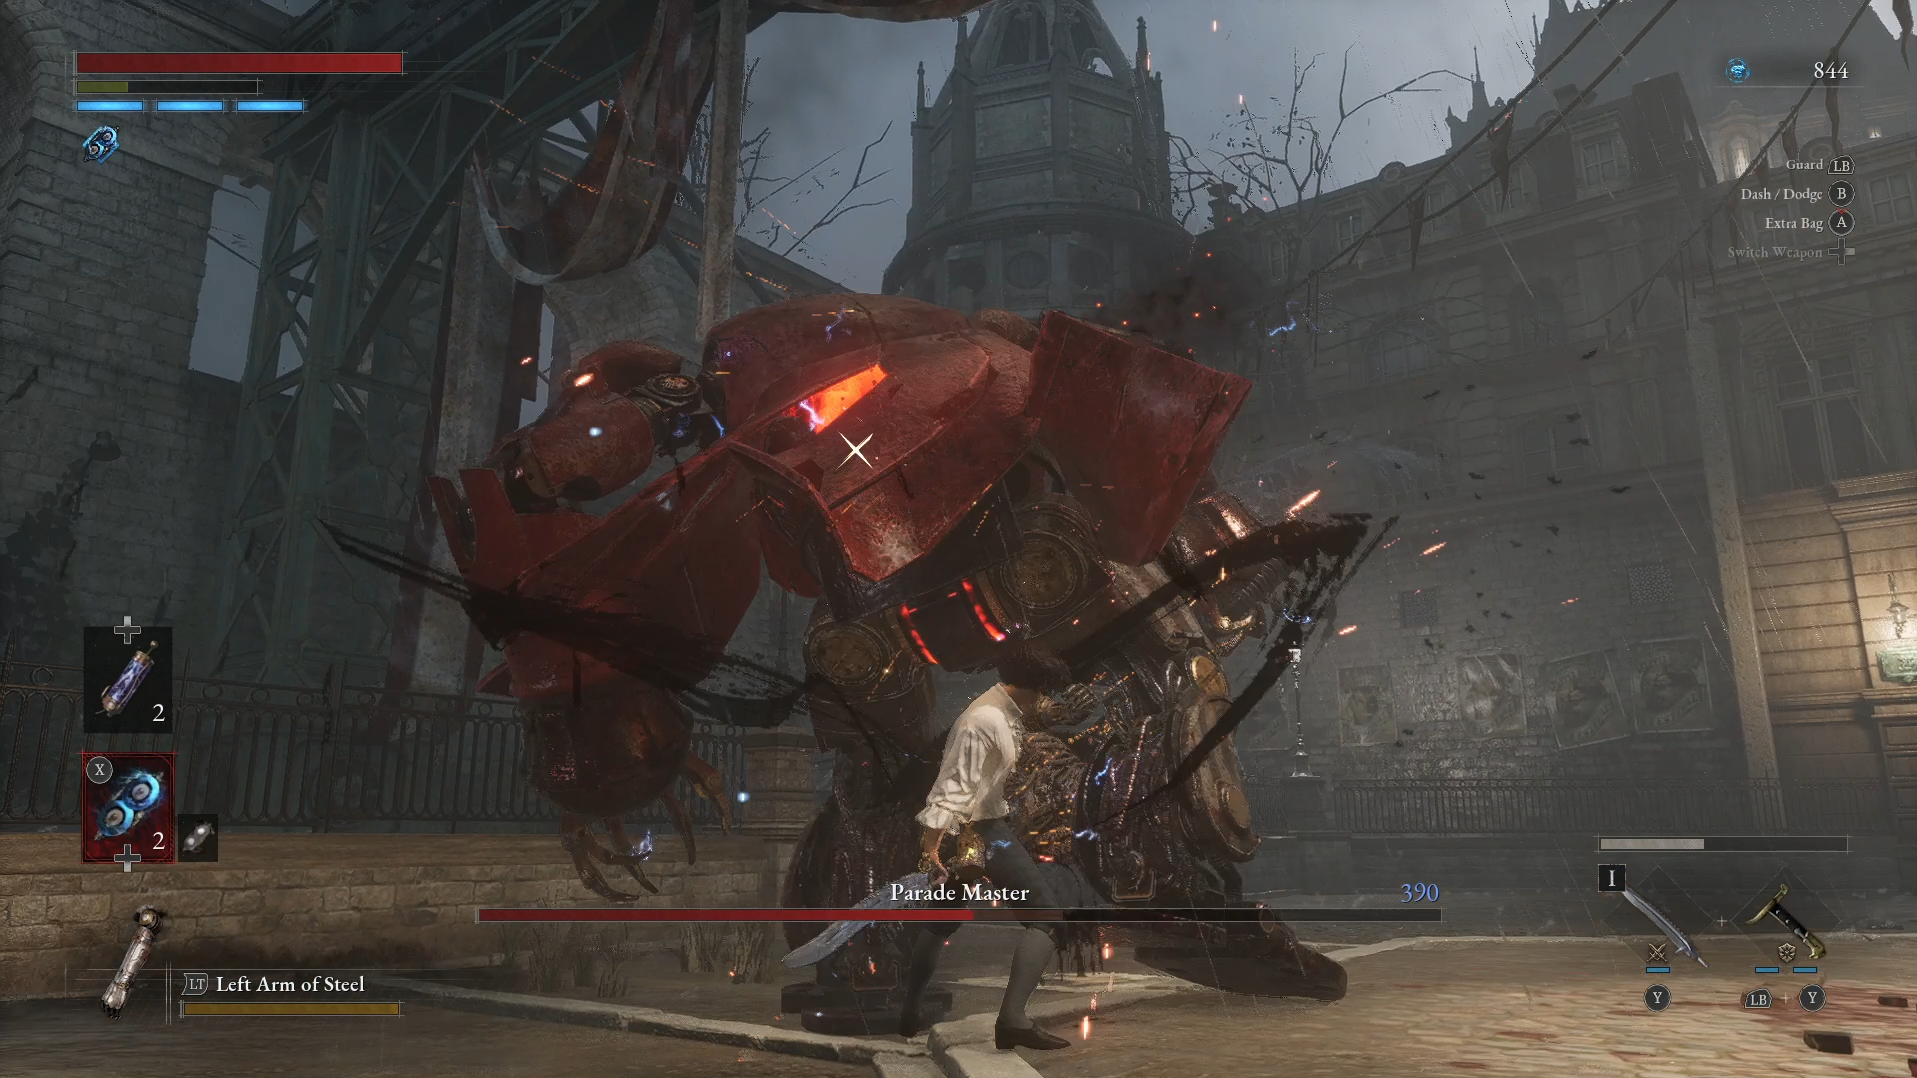
1. Parade Master
Location: Krat Central Station
Reward: Parade Leader’s Ergo, Quartz, 1,852 Ergo
Trophy: Parade Master
Things to focus on:
- Maximize your dashes
- Beware of his follow-up attacks
- Maximise chain attacks when he is recovering from his follow-up attack
The first boss you will come across in Lies of P is the Parade Master, and he is one of the easiest ones to beat in this list of Lies of P bosses, especially if you’ve played through the demo and fought him before. He is a large puppet focusing on sweep attacks and a powerful slam. He also moves with a good amount of speed and will dash at you. His battle has two phases, but his moves are predictable as they are rather fixed.
Phase 1
Get away from him and wait for his dash attack, which is typically followed by a slash or slow jab. Be sure to dash away from his follow-up attack and do a heavy attack combo or chain multiple attacks while he’s vulnerable. Repeat all this until his health bar reaches about 60%, where he will take the cage off his back and slam it on the ground.
Phase 2
This time, his rage increases as he rips off his head and attaches it to a stick to make it a club-like weapon. His weaknesses remain the same, but his attacks will follow a different pattern. Distance yourself from him and wait for him to dash forward. He will take three quick steps forward before sweeping right and left. Be sure to dodge these and then hit him with a heavy combo or chain multiple attacks once again.
You can either do this or parry his attacks when he tries to hit you with his club. However, you’re better off playing it safe by dodging. Repeat this dance of backing off, dodging, and rapid attacks until he is defeated.
2. Mad Donkey (Optional)

Location: Elysion Boulevard
Reward: Enigma Assembly Tool, Mad Donkey’s Hunting Apparel, Mad Donkey’s Mask, Hidden Moonstone, Krat City Hall Key
Trophy: –
Things to focus on:
- Gauge the range of the boss’ ranged attacks and dodge accordingly
- Boss is vulnerable once he whiffs his overhead swing
This battle is optional, but it does grant a good number of rewards. Plus, it’s an easy fight as you’re going up against a humanoid with a similar moveset to yours. He’s a wild swinger, and you can simply dodge all of his swings or stay out of range, then backstab him with a Rear Fatal Attack.
Additionally, you can wait for the slow overhead swing that will leave him vulnerable for a couple of seconds and attack him multiple times. He’s wide open, and you can repeat this until he is defeated. Aside from the rewards, your maximum number of Pulse Cells will increase when this battle is done.
3. Scrapped Watchman

Location: Krat City Hall
Reward: Broken Hero’s Ergo, Core, Small Wooden Office Puppet, Overcharged Storage Battery, Quartz, 5,040 Ergo
Trophy: Scrapped Watchman
Things to focus on:
- Watch out for his jump attacks, and once it has been executed, he is vulnerable
- Dash inwards toward him during his arm-swing attack to close the distance and avoid damage
Another boss fight within this Lies of P bosses guide that may be easier if you’ve played through the demo. The Scrapped Watchman is a giant mechanical puppet that resembles a policeman. Before you engage in this fight, be sure to summon a Specter at the fountain before the fog door. This will help you immensely in battle.
Phase 1
The Scrapped Watchman has similar slashing and squashing attacks as the Parade Master but with more speed. You can use the same strategy as before by staying out of his attack range and waiting for him to take a big slow swing or a jump attack which leaves him vulnerable. He will occasionally dash forward to attack as well, which leaves him a little off-balance and vulnerable.
Optionally, you could utilize the Specter that you’ve summoned to aggravate him by stepping away from the fight and letting the Specter do the work. You can attack him while he’s distracted. The attack you need to watch out for is his quick side-to-side swipe which ends in a series of 5-6 attacks.
Lastly, he has an arm swing attack where he swings his forearm in a circle multiple times before slamming it down. You can dash towards him right before impact to avoid damage and fight back. He usually does this arm swing attack twice in a row and then adds a Fury Attack, so be aware.
After you’ve depleted his health to about half, he enters the second phase.
Phase 2
This time he is entirely electrified. His attacks largely remain the same, but he now has lightning strikes. You can avoid these lightning strikes by paying attention to the static on the ground after his attacks, as they are usually followed by a lightning strike. These lightning strikes deal some damage and will stagger you.
Furthermore, he adds a grab attack this time which will cause huge damage to you. This grab attack looks similar to his large sweep attack, but his hands will be in the air longer, so dash away while you can. You need a lot of practice when it comes to timing and dashing in order to successfully make it out of this fight alive.
4. Puppet of the Future (Optional)

Location: Workshop Union Culvert
Reward: Quartz, Radiant Ergo Chunk
Trophy: –
Things to focus on:
- Kite the boss and use a patient approach; a hit-and-run play is recommended
- Beware of his spinning and wrecking ball move
This is another optional boss fight when it comes to the Lies of P bosses. It features a giant puppet with two wrecking balls. He’s an easy one to beat, so don’t be intimidated by his size. He’s quite weak and slow. Attack him 2-3 times on his legs and run away when he starts to spin his wrecking balls or tries to stomp on you. Repeat this to whittle away his health.
When he’s weak, perform a Fatal Strike to get his health down. All you need is patience when it comes to this puppet.
5. Survivor (Optional)

Location: Workshop Union Culvert
Reward: Stalker’s Promise, Survivor’s Mask, Survivor’s Hunting Apparel
Trophy: –
Things to focus on:
- Same strategy as Mad Donkey, but you’ll need to adjust to his quicker speed
An easy optional boss fight for those who are looking to complete their mask or apparel collection. And, perhaps, the completionists too. The Survivor fight follows the same movements as the Mad Donkey but faster. This time, prioritize dodging rather than parrying. Try to get behind him for more backstabbing Fatal Strikes.
6. King’s Flame, Fuoco

Location: Venigni Works
Reward: High Powered Flame Amplifier, King’s Flame Ergo, Flame Grindstone, 7,081 Ergo
Trophy: King’s Flame
Things to focus on:
- Gauge his AOE attacks and avoid them accordingly
- Utilize your dashes efficiently, especially during his Fury Attack
- Widen the gap when you notice him opening his legs to allow fire to be unleashed
Now this is where things get slightly more difficult. This giant furnace puppet wields a hammer and a hand cannon. His attacks have different timings, even if the patterns are similar to those of the previous Lies of P bosses. However, he can be rather slow due to his size. Here’s what you can do:
Phase 1
His attacks cover a large area, so be sure to dodge them or retreat. His attacks include side-to-side sweeps and forward slams, as well as a combination of those. There’s also the triple sweep attack which you will want to avoid. For his Fury Attack, he will turn red and spin his fist, but you can avoid getting hit by running to his side or out of the way as dashes forward.
He is taking a break if he stands up and brings his hammer-wielding hand to his side. This is when you hit him with some hard-hitting combo attacks. Any other movements with his arm mean that he’s about to attack.
Phase 2
This starts when his health is about half, and he starts to open the furnace between his legs to let fire pour out. Don’t get too close as there’s a risk of going into Overheat, and you’ll start taking damage. You can get rid of it by rolling around.
Furthermore, Phase 2 focuses on ranged attacks, where Fuoco will start shooting fireballs and oil balls. Be aware of your surroundings and avoid any oil spills on the ground, as it will result in massive damage if you get hit by a fireball. You could simply stay closer to him so you don’t have to deal with any ranged attacks as well.
Aside from that, he has a midrange flamethrower attack and an overhead slam Fury Attack which cannot be dodged. The flamethrower attack can be avoided by getting behind him. For the slam Fury Attack, run to his side or attempt to perfect guard against it.
7. The Atoned (Optional)

Location: Moonlight Town
Reward: The Atoned’s Mask, Cable Railway Key
Trophy: –
Things to focus on:
- Try to aim for her behind. Be as mobile as possible
- She is stagnant when she uses her Fury Attack allowing you to reposition yourself
Now there are two ways this could go, resulting in two difficulty levels for The Atoned. When meeting her for the first time, you could choose to lie to her and give her a Stalker’s greeting or you could simply do nothing.
If you choose to give her a Stalker’s greeting, you will bypass her, but when you meet her later in the game, you will have to fight her. If you do nothing, then you will end up fighting her right then and there. This fight is harder than if you chose the first option and made Pinocchio a liar.
In terms of the battle, it is relatively easy. Be sure to try and get behind her to get in some Fatal Strikes, as well as dodge her attacks rather than parrying them. The Atoned moves faster than the Survivor, but a good charged attack or quick slash is good enough to damage her. Her Fury Attack allows her to stand still and charge for a moment before quickly jumping towards you and attacking with her fist. You can dodge or attempt a perfect block for this.
She does not have any other surprising movements, so you should be able to get past her by continuously giving her Fatal Strikes from behind.
8. Fallen Archbishop Andreus

Location: St. Frangelico Cathedral
Reward: Twisted Angel’s Ergo, 8,778 Ergo
Trophy: Fallen Archbishop
Things to focus on:
- Once you notice his hands are moving, prepare to dash towards the boss
- When the boss is charging up blue energy, widen the distance as quickly as possible
- Spectre comes in super handy here
Here we have another giant freak of nature in the Lies of P bosses lineup. This time, it would prove to be useful to summon a Specter for a good distraction. For some reason, the Spectre is tankier and can sustain a ridiculous amount of damage in this fight, making it beneficial to you. Fallen Archbishop Andreus has claws that he uses to perform various sweep attacks and slams.
Phase 1
You can tell what attack is coming by the position of his hands. If they are raised in the air, it means a slam is coming. If they are on his side, it means he’s going for a sweep. Both attacks have a wide range. So, try to dodge by dashing towards him right before impact to avoid getting hit and be in range for an attack of your own.
However, do keep in mind that his attacks usually come one after another. Unless he lays his hands flat on the ground to stand up straight, he is not done. But when he does this, make sure to attack him with full force. Additionally, he has a tongue lash attack that you can dodge or block as they don’t deal much damage. After his second tongue-lash, he will take some time to recover, which is great for you to deal more damage.
As for his Fury Attack, he will raise his body into the air and slam it down or on the space in front of him, depending on where you’re standing. You can avoid getting damaged by running away and coming back to attack him when he’s slammed down.
Phase 2
In this phase, we get to see an angel sprout out of his back, adding another enemy to go up against. This angel attacks with their own set of slams and sweeps as well as magic bursts. You can simply ignore the angel and attack Andreus, but the magical attacks will be an issue to contend with.
When you notice the angel lifting their staff in the air and gathering blue energy, be sure to run as far away as you can. There’s also the puke attack, where the angel lowers itself and starts vomiting from side to side. Again, run away from it or attack the main body, completely ignoring the angel.
Lastly, this duo has a multi-dash attack. The beast slams its hands down, screams, and dashes towards you. While doing so, it will spin its body to let the angel get in some attacks as well. They will repeat this a couple of times and end it with a Fury Attack. The only advice we could give is to run away and dodge. When the boss is tired from the Fury Attack, you can put in some damage as well.
The strategy is basically to repeat what you did in Phase 1 and to watch out for the magical attacks from the angel.
9. The Eldest of The Black Rabbit Brotherhood

Location: Malum District
Reward: Taunt Expression Gesture, Resplendent Ergo Chunk, 10,180 Ergo
Trophy: The Delayed Match
Things to focus on:
- Has a “rest” moment where you can get in a couple of free hits
- Watch out for his final attack after his spinning move that can catch you off guard
- Consider taking out his companions as they go down quick
Whilst the Andreus fight makes you go up against two enemies, The Eldest of The Black Rabbit Brotherhood will bring you against four. And, yes, this is one of the Lies of P bosses on this list that is completely unfair.
However, the only one that matters is the eldest, signified by the health bar. That doesn’t make it any easier, though. This is another fight where summoning a Spectre might buy you some time.
The Eldest’s move set consists of slashes that he combines with some unpredictable timings to make it harder for you to read his moves. He can slash and swing anywhere between four to five times per combo. However, when he stands up and holds his blade behind his legs, it means he’s taking a break. There’s your chance.
He does have an overhead swing which is easy to tell since he raises his sword above his head for a significant amount of time before bringing it down. Even so, this attack has a long-range, and he can combine it with more slams that end with a Fury Attack. You can dodge this attack or run if you’re not confident.
There’s also his slow-spinning slash attack, where he swings in circles with his blade at chest level while moving towards you. He ends it with a dash and one final attack at you. For the leaping slash and running slash, these are pretty obvious, and you can dodge them before they hit you. Since most of his attacks have a long recovery time, you can deal some heavy damage.
Now with this fight, there are not any phases, but the three other enemies will join the fight every time you manage to take out about 25% of the Eldest’s health. Typically, in this order:
- The Sister: She uses a short sword and has quick dash attacks and combos.
- The Bucket Head: He will charge at you with a spear and favors striking from a distance. He also has a leaping attack which will put him on the other side of you in an attempt to pincer you.
- The Red Scarf: He has a curved blade and a tool on his arm similar to the Puppet String Legion Arm. He can pull you in with it. He will also dash around and has quick dash combos.
These enemies are easier to dispose of; they can be defeated within 3-4 combos. But, they are far quicker and serve as backup to whittle away your health. Remember, do not get cornered by the Eldest and his friends, or else you will find yourself dead. Keep them in your sight at all times, with some distance in between.
10. The White Lady (Optional)

Location: Rosa Isabelle Street
Reward: The White Lady’s Mask, The White Lady’s Locket
Trophy: –
Things to focus on:
- Dodge more rather than trying to parry
- She’s at her most vulnerable after her prolonged lunge attack
When it comes to The White Lady, she’s super fast and an expert in lunges. Your best bet is to get behind her for backstabs and Fatal Strikes. There is one particularly long lunge attack you could wait for her to execute, which will leave her resting for a long while. It will be easier for you to attack her here.
Furthermore, there’s no point in guarding against her attacks. It is better to just try dodging them. Keep going at her with short heavy attacks and backstabs. The battle will be over in no time.
11. Mad Clown Pupet (Optional)

Location: Rosa Isabelle Street
Reward: Quartz
Trophy: –
Things to focus on:
- Very vulnerable when the boss is recharging
- Try to go for Perfect Guard instead of dodging
One of the more tougher optional bosses when it comes to the Lies of P bosses, it may not even be worth it to go up against the Mad Clown Puppet. But if you find yourself fighting him anyway, here’s what you can do.
The Mad Clown Puppet wields a massive punching fist and is protected by multiple flame and grenade-throwing puppets at the top of the street. You will have to deal with them first before dealing with the Mad Clown Puppet. Luckily, they are quite easy to dispose of.
Eliminate the first flame-throwing puppet and lure the remaining two towards you, dodging their attacks. While they are busy recharging their flamethrowers, you can easily backstab them. Eliminate the grenade throwers in a similar fashion and the final flame thrower. When the street is clear, aim for the Stargazer on top of the stairs and activate it.
Activating the Stargazer ensures that you don’t have to go through the pain of eliminating these puppets and boss all over again. Now to focus on the Mad Clown. Do not be fooled by his size; he is extremely fast and favors Fury Attacks. As such, dodging may be useless, and Perfect Guard may be your only hope.
As you guard against him, be sure to land in some charged heavy attacks and Fatal Strikes. One of his signature moves includes a spinning attack where he will spin 6 consecutive times and a swift left hook after a short pause. He also has a lunge attack where he will jump back with his fist to the ground before lunging in your direction.
Lastly, one of his more difficult-to-counter attacks is a combo where he throws a left hook, spins and swings with his right arm, then jumps and slams to the ground. As previously mentioned, he favors Fury Attacks. He has different ones depending on your proximity to him. If you are far away, he will fire out his fist. If you are close, he will let out some quick swings.
Most of these require precision and timing to Perfect Guard against, so do practice it while you can.
12. Kin of Puppets

Location: Estelle Opera House
Reward: Burnt-White King’s Ergo, Puppet Prince’s Formal Dress, Someone’s Necklace, 11,025 Ergo
Trophy: King of Puppets
Things to focus on:
- Summoning a Spectre is very useful here
- Beware of his long-range attack that cannot be blocked
- Super vulnerable when his weapon is stuck on the ground
The King of Puppets is a giant armored puppet with big sweeping attacks and special attacks that cover long and close range. Again, you could summon a Spectre to help you distract and aggravate him this time around as well.
Phase 1
He has two melee attacks. For close range, he will lash at the ground surrounding him with his long arms, striking about two or three times before stopping. For longer range, he will do a forward slam where his torso will spin 360 as he slams on the ground. He may mix it up a little and do multiple slams in a row, so make sure that he is thoroughly done before making your move.
Both these attacks can be easily dodged, and you can land a heavy attack or two as he recovers. When he reaches about 40% of his health, he will roar and throw out some punches to signal the next phase.
Phase 2
This is where his attacks get more flexible and acrobatic. He will lift himself and jump at you or over you, as well as show off some new punch and sweep attacks. You can guard against these attacks or try to dash toward him so he will overshoot.
When it comes to his special attacks, he has one where he will flip his body around and suck in air through the fan on his back. This is a vacuum attack and is an unblockable long-range attack. Make sure to run away when you see him start to charge up this attack, or you will be caught in a damaging shockwave.
There’s also his spinning tornado which looks similar to the previous attack, but this time, he rises upwards and spins his torso around, building a ring of energy around him. Again, just run away before the attack begins.
Lastly, there’s his gun attack, where he rears back and fires off some projectiles that create a minefield around him. These mines will explode after a short amount of time, so run away from them or towards him to attack him while he is revving up.
Phase 3
Once you’ve depleted his health, the real King of Puppets – Romeo, climbs out of the armor. This time, you’re fighting against a super-quick human who will jump and dash around the battlefield while dishing out quick attacks. As such, you will have to time your attacks properly and stay away from him.
Romeo has a ton of tricky melee combos, making it hard to guard against unless you’re a pro. So, you will want to trigger his long-range attacks instead, as it gives you more time to react and think things through. He has a long-range jump slam that will either leave his weapon stuck in the ground or lead into a Fury Attack where he lifts his body and slams his foot down in front of him.
You can attack him if his weapon is stuck in the ground. For the other situation, be sure to run out of range. Another one of his Fury Attacks would be his jumping slam, which you can tell as he glows red and floats in the air before coming right down on you. You can avoid this by running, dodging, or jumping away. You can then run back with a big attack, as he is vulnerable.
At some point, he will point his scythe at you while his eyes glow red, then lunge at you with a spinning slash or a powerful uppercut. You can avoid this one by running straight towards him, which should ensure he misses you completely. Most of the time, he will be using dash attacks or jump attacks, so be alert.
The most difficult part of this fight is when he sets his sword on fire and dashes towards you with more slashes. This attack is impossible to run away from and is incredibly difficult to dodge. Your best move would be to heal up to the max and attempt to guard yourself against some of the attacks while landing some of your own. Additionally, do know when to dash away or run.
13. Champion Victor

Location: Grand Exhibition
Reward: Reborn Champion’s Ergo, 14,020 Ergo
Trophy: The Champion of Evolution
Things to focus on:
- Has a fake move that might fool you into thinking his attack string has stopped
- Try to position yourself to be able to hit him from behind
- He can still dish out some attacks once he is staggered
A giant humanoid abomination on this guide to all Lies of P Bosses that thankfully only uses his fists rather than some ridiculously large weapon. This makes his reach more limited, and you can stay away from him to avoid damage. However, he is also super fast, and his damage is ridiculously massive. You can dodge him or bring a Spectre to help.
Phase 1
At close range, Victor lashes out with his punches and swings that usually end with a fake stop and quick punch to the gut meant to dupe you. When that’s done, you should look out for his posture before you attack. If he is standing up with his shoulders back, it means some combo attacks are about to come your way.
The combo can either be alternating gut punches or one of his Fury Attacks. You can run away when you spot this since these can be impossible to dodge. A good strategy to employ is to continuously run in and out of his attack range to bait an attack and dodge. As such, you can also get in some attacks of your own.
Another tip, when you are behind him, he will typically default to a slow spinning elbow swing to try and catch you. Just be ready to dodge when he raises his arm, and you can continue running around him.
If you prefer to activate his long-range attacks, which mostly consist of jumping and dashing with a combo of punches, do remember to just run and wait for his gut punch. Most of his attacks are easy to dodge if you keep an eye on his movements.
There’s also his haymaker and crouching dash attack, which starts with a roar as he gets on all fours. These are pretty obvious, so just run out of his way, and get right back in to deliver a quick attack.
Phase 2
When his health hits half, he will shed his mechanical armor, and we get his true form. Somehow, this phase is easier as his attacks largely have a longer cooldown. Plus, his taunts will give you more time to attack.
His attacks have some additional moves to them and different variations of his previous moves. A great advice is to watch how they play out before making your move. One you should keep your eye out for is that he will throw out an attack when he is staggered. So, even if you break his stance, don’t run in for an attack immediately, or you’ll get a punch or two.
Even so, whatever you did in Phase 1 should work in Phase 2 as well. Run around, watch his moves, and get in as many attacks as you can. Getting behind him is also a solid plan of attack still.
14. Owl Doctor (Optional)

Location: Barren Swamp
Reward: Owl Doctor Mask, 2,948 Ergo
Trophy: –
Things to focus on:
- It is recommended that players break the Owl Doctor’s weapons first
- Backstabs are great, and try to consistently dodge his ranged-dagger move
The Owl Doctor’s fight patterns are similar to the Mad Donkey, so try backstabbing him multiple times or use charged attacks when he’s on guard. The Owl Doctor wields a saw and a dagger during his fight and will throw daggers at you if you’re far away.
Your best bet is to break his weapons by attacking while he’s guarding and performing more Perfect Guards of your own. If you’re lazy, backstabbing him and landing Fatal Strikes multiple times works too.
15. Green Monster of the Swamp

Location: Barren Swamp
Reward: Puppet-Devouring Green, Hunter’s Ergo, Golden Ergo, 14,986 Ergo
Trophy: Puppet-Devouring Green Monster
Things to focus on:
- Predictable moves but might need precise timing to dodge/parry
- Once the boss is standing, he is preparing for a huge string of attacks
- Try to gauge the coverage of his attacks
Here we have something completely different from our previous Lies of P bosses. There are no obvious slamming or sweeping attacks here. Instead, we have a wide range of attacks which may be difficult if you don’t know what you’re doing.
This monster seems to be a spider-like creature which turns into a mechanized puppet in the second half. Hence, we would recommend you bring a Specter with you.
Phase 1
For long-range attacks, the monster has two options. It will either dig itself underground and burst out right under you or a Fury Attack dash. For this, it will attempt to bulldoze you, running straight for you. Both require precise timing to dodge or avoid. Either that or you can just run far away. Typically after these moves, it will be vulnerable, so attack it while you can.
Additionally, there’s the stabbing attack, where the creature will back up before lashing out with one of its arms. This covers quite a bit of distance, but you can see it coming and dodge out of the way.
For short-range attacks, it will attack you with a whip of its arms which inflicts a lot of Decay. The tell-tale sign would be a headshake. Another attack that could follow his headshake would be a vomit of poison. Similarly, this also inflicts Decay. For both, you should run away the moment you see his head shake.
Lastly, when the creature stands on its hind legs and roars, he is prepping to do a combo. This consists of a swipe, swipe, double hand slam, and swipe. You can either dodge, block, or run away to deal with this attack. Just remember to run back in and get some hits in before he is ready to fight again.
Phase 2
Right when the monster gets nearly defeated, it climbs into a discarded puppet carcass that resembles the Scrapped Watchman. As such, most of its moves resemble the Scrapped Watchman, with a little twist.
It will lash out with its tentacle-like arms alongside all of the Scrapped Watchman’s typical moves. As a refresher, the Scrapped Watchman has arm sweeps, slam combos, and Fury Attack body slams. All of this remains the same, with the addition of more tentacles lashing out right after.
Furthermore, the arm-swinging attack will now be combined with a Fury Attack more often, so keep your guard up and run away. The creature will dash around and do some jumping slam attacks, which it will repeat multiple times in a row or add a Fury Attack to. The creature’s bulldoze attack gets an upgrade as it will now charge after you three times in a row, ending in a Fury Attack. Try to dodge it and stay out of its path.
There’s also a new short-range attack, where the creature flips its torso upside down and uses a tentacle attack with quick damage and Decay. It’s easy to spot and easy to dodge. Get back at the creature when its torso flips back to inflict your damage.
Aside from that, the creature has two lunge attacks. One where it rears back, twists its hand, and jabs forward. The second is where it raises its hand behind its back and pauses before dashing forward with a damaging stab. Both are easy to spot and dodge but remember to look out for any tentacle lashes.
The last and most annoying attack is the tentacle grab. It’s very difficult to avoid and deals a huge amount of damage as well as Decay. The creature will stand on its back leg, raise its tentacles, and fling them forward to grab you. Now this depends on your own reaction time and precision. If you act quickly, you can dodge it.
16. Robber Weasel (Optional)

Location: Krat Central Station Platform
Reward: Robber Weasel’s Mask, Robber Weasel’s Hunting Apparel
Trophy: –
Things to focus on:
- Very average moveset but extremely agile
- Backstabbing and dashing are your best friends here
The Robber Weasel wields a small axe and has quick movements. You can try to backstab him, but it will be trickier as he can be quite fast. Overall though, he has very simple move sets and should not be an issue for you to defeat.
His moves include a double slash combo as well as a downward and upward strike. He can also throw knives at you or perform a lunge attack. We recommend parrying and dodging his attacks. Fatal Strikes would be best, but only perform it when confident.
17. Walker of Illusions (Optional)

Location: Collapsing Krat
Reward: Legion Caliber, Dark Moon Moonstone of the Covenant
Trophy: –
Things to focus on:
- Always close the distance and keep her close
- Dodging isn’t so good here, and you might want to parry more
- She’s at her most vulnerable when she is cloning
A fast-moving enemy that can clone herself halfway through a fight. She wields a double blade, and the small space the fight takes place in makes it hard for you to run away, dodge, or dash to safety. For this fight, your best bet is to fight in close range, as her dash attacks are more lethal than her melee ones.
Phase 1
However, we do not guarantee your safety as some of her melee attacks do have a far reach. Your best bet is to Perfect Guard or dodge her attacks while getting in some attacks of your own. You could also attempt to parry her attacks. All of this requires precision and the right timing. Additionally, she will occasionally jump away from you, so close the gap.
Phase 2
At half health, she will jump away from you and clone herself. Her clone has a health bar above her health and a lower health pool, so it is easier to defeat her. You can attack her while she’s busy duplicating, as she will be stuck in that for a while. Your best bet is to defeat the duplicates first, then continue attacking her.
18. Corrupted Parade Master

Location: Collapsing Krat
Reward: Quartz, Full Moonstone, 15,619 Ergo
Trophy: Corrupted Parade Master
Things to focus on:
- Basically, Parade Master with more gimmicks
- Read his multi-swing attacks and torso-varied attacks
- The usual hit-and-run strategy works well here
This is a mutated version of the Parade Master, so his movements will be similar with extra additions and variations. You should be fine since you’ve defeated him before. Just recall the same moves. Either that, or you could scroll back up on this guide to the Lies of P bosses.
Here are the varied moves you should look out for:
He has a double dash into swing where he holds his weapon above his head, steps forward twice, and does a horizontal swing. With this, he occasionally does a multi-swing combo as well, so be sure to watch his movements closely. If he is moving rather than resting, it means he’s not done.
As for his body slam, he has one variation where he will flail on the ground after, so don’t be alarmed. Simply dodge his body slams and attack when he’s done. He also spits out some minor enemies from his mouth that have low HP that you should deal with immediately.
Lastly, you should look out for his haymaker variation. He will twist his torso and run at you with his tentacle in the air, and then he does a massive sweep. This varies from a single to three hit combo, which ends in a Fury Attack.
Overall, if you just dodge and keep a distance while attacking, you’ll whittle away his health in no time.
19. The Black Rabbit Brotherhood

Location: Relic of Trismegistus
Reward: Quartz, 16,059 Ergo
Trophy: Revenge of Black
Things to focus on:
- Make sure to have ailment-resisting equipment equipped
- Has a new wave energy attack, indicated when his arm goes blue
Your previous battle with the Black Rabbit Brotherhood is largely centered around the Eldest, and the rest comes in waves. This time, you’ll have to go up against three at once. Plus, they each have modified weapons that can inflict different types of damage – Decay, Overheat, and Electric Shock. Hence, we recommend bringing along a Spectre and equipping any items that can resist status ailments.
The one good thing is they don’t ambush you all at once. One of them will come up to you as the rest slow down and stay away for a short amount of time. They will eventually come in, but they do give you a short pause to get in some attacks and combos against the one person first. Additionally, these guys can be backstabbed and can be staggered by heavy attacks pretty easily.
Note that the Eldest will only join in on the fight once you’ve got them down to one surviving member. A good strategy to employ is to kill one first, then whittle away the other two until they are barely alive before killing them both together to trigger the Eldest fight. This way, you end up in a fairer fight with the Eldest.
At this point, you can just use the same tactics and strategies from his previous fight. So far, he only has one new attack where he will release a huge wave of energy from his sword, which drags along the ground. You can spot this when his arm starts glowing blue. Avoid the energy wave by dodging or hiding behind the obstacles scattered about.
20. Door Guardian (Optional)

Location: Arche Abbey
Reward: High-level Alchemist Badge, 7,858 Ergo
Trophy: –
Things to focus on:
- Go for the leg that is exposed
- His attacks don’t have a lot of range, so keep your distance
- Look out for his somersault attack during his Fury Attack phase
A giant humanoid abomination similar to the Champion Victor, but he wields a club. As a big guy, he moves slowly, and his attacks are rather predictable. You can deal with him the same way you dealt with the Champion Victor.
One of his legs is covered in armor, while the other one is exposed. So if you want to inflict damage, aim for the other leg. Once he is staggered, he falls, and you can deal a Fatal Attack to his head, which deals a huge amount of damage.
His attack patterns include close-range foot stomps, overhead slams, and hand swipes. You can avoid getting hit by staying far away and then dashing in for an attack when he is resting. There is the option to dodge them if you’re good at that, as it saves you time from running in and out. However, you should also watch out for his Fury Attacks at close range.
In particular, he has a Fury Attack Elbow Drop, which he can follow up with a somersault attack. Back away when you see this and wait for it all to be done before heading back in. Note that if he staggers and falls, dodge, or it will damage you.
21. Black Cat (Optional)

Location: Workshop Union Culvert
Reward: Black Cat’s Mask
Trophy: –
Things to focus on:
- Has a predictable attack pattern
- Staggering and attacking him from behind will make quick work of him
You can skip this battle if you agree to give the Black Cat a piece of Gold Coin Fruit. But, if you rather fight him, you should know that none of his attacks are basic and easy to predict. You don’t need to have perfect timing to dodge or sneak in an attack. You can parry his attacks and try to backstab him as usual. After you manage to stagger him, it will be easier to end his misery.
22. Laxasia the Complete

Location: Arche Abbey
Reward: Sad Zealot’s Ergo, 16,650 Ergo
Trophy: The Complete One
Things to focus on:
- Has a lot of misleading delays to her attacks that will catch you if you are impatient
- Attempt attacks when she has her sword on her shoulders
- Dashing correctly is extremely vital in this fight
You’re so close to the end! Laxasia is the last one standing between you and Simon Manus. She is a humanoid with a giant electrified sword and a ridiculous suit of armor, as well as a shield on her back.
Phase 1
Her attacks are well thought out to bait you, so don’t fall for her long pauses in between attacks, or you’ll be served with her fast multi-hit combo. Her default stance is when she stands up and places her greatsword on her shoulder. This is when you know she’s done with her combos. You can stand out of the way until you notice she’s done, so you can get in some attacks.
Now, her pesky shield. Once you hit it enough times, it will break and expose her back. This makes it easier to backstab her or damage her from the back, so we recommend you focus on this early on.
As for her sword combos, she has an uppercut slash combo and a downward slash combo. They both start with a single slow swing and end with a Fury Attack. You can Perfect Guard against them if you learn the pattern of the combos, or you can simply run and dash in with an attack.
Other basic attacks include:
- Jumping slash
- Short-range kick
- Running sword attack where she rams you with the side of her sword.
Aside from that, she has an electric trail where she places her sword on the ground behind her and rushes at you. This leaves sparks on the ground that will explode and deal damage if you are nearby. To avoid it, dash past her when she swings at you, then attack her right back.
More lightning attacks include:
- The lightning stab where her blade will get struck by lightning, and she dashes at you. She will sometimes link this with an overhead lightning slash that leaves an exploding crater on the ground. When this happens, try to get behind her to avoid it.
- She raises her sword to the sky, causing lightning to strike all around her. She follows this up with a Fury Attack slash that causes an electric explosion on the ground. If you are out of range, you will not get hit. Plus, you can take advantage of her resting after the Fury Attack and damage her.
Phase 2
This time, the armor comes off, and she equips her shield. Remember Romeo’s fight? Laxasia fights similarly as she dashes around, inflicting more damage and electric shocks. Her playstyle becomes more aggressive, and it is harder for you to land an attack.
At the start of this battle, she will spend a lot of time in the air firing lightning at you. The thing is, you can Perfect Guard against the lightning to reflect them at her, which will help build stagger and deal massive damage.
After this lightning bolt attack, she will use a Furry Attack and fly straight at you. This one is harder to avoid as it needs perfect timing. However, it takes a long time for her to recover, so you can take advantage of it and deal more damage.
She will continue to run in and out of range with quick attacks, one after another. Here’s some of what you can expect:
- Jump slashes
- Laxasia throwing lightning bolts across the ground
- Summoning lightning bolts from the sky
- Shocking the ground with lightning
- A long-distance Fury Attack thrust
She does a whole lot, and it may be terrifying, but we recommend just blocking, dodging, and running until she is vulnerable to getting in your attacks.
Some more notable attacks that are easier to deal with include:
- A shield bash to jump slash where she lingers in the air after a shield attack and comes back to the ground.
- An electrified jumping slash where she charges her sword and leaps into the air, floats for a couple of seconds, and slams down. You can avoid getting hit by being behind her when she lands. A cheeky attack here works as well.
- She can also stand in place to gather energy and rush at you with her shield out. She will repeat this multiple times, then end it with a Fury Attack. You can get behind her as she is gathering energy and run around her that way to avoid getting hit and get in another hit.
After a couple of times attacking her, she will be Staggered and execute a long combo attack that ends in an electric burst. Only approach her when the Fatal Attack symbol appears. After your attack, she will repeat the first attack once more. Keep staggering her, and you’ll finally defeat her.
We recommend bringing a Perfect Guard grindstone and using it around this point, as it will help you stagger her almost immediately. After that, her health should be significantly dwindled.
23. Red Fox (Optional)

Location: Workshop Union Culvert Stargazer
Reward: Red Fox’s Mask
Trophy: –
Things to focus on:
- Very similar to the Black Cat, predictable attacks that are easy to parry and dodge
- Backstab attacks and constant movement will win you the fight
Like her brother’s encounter, Red Fox will ask you for a Gold Coin Fruit. To trigger the fight, you have to decline. Also, note that if you decide to accept the request of both Black Cat and Red Fox, this fight will not trigger.
She is another easy fight, though, as her attacks and patterns are similar to her brother’s, with a little more complexity. Her combos are long, and her movements are fast, but as long as you can backstab her and dodge her attacks, you should be fine.
The Red Fox does have some jumping and twirling attacks which you can block with good timing or parry. Our advice is to be patient, learn her attack patterns, and not rush the battle.
24. Simon Manus, Arm of God

Location: Arche Abbey
Reward: Fallen One’s Ergo, Arm of God, 18,153 Ergo
Trophy: The Awakened God
Things to focus on:
- Specters are great for this fight for drawing attacks away from you
- Most of his attacks have a charging period, so you’ll know how to react
- Try to conserve as much as you can for his second phase
The culmination of all previous battles has led you here to confront the villain of the game, Simon Manus. He’s a giant mutated humanoid who wields a big club as a weapon that shares some similarities with most of the bosses in the game. Makes sense that your final battle will be with someone who combines the attacks of everyone else’s.
We recommend you bring a Spectre along as it makes things easier for you in Phase 1. You do need to conserve yourself and your resources for Phase 2 of his fight, where things get significantly more difficult.
Phase 1
His telltale relaxed sign would be when he places his mace back on his shoulder and squats a little after attacking. If his mace is in a different position, it is more likely he will be throwing in another attack. He does have a massive range with tricky timing to bait you.
In terms of basic attacks, his include:
- Side-to-side sweeps
- An overhead slam
- A long-range jab
These can be avoided by dodging and dashing around.
For special attacks:
- Manus raises his mace in the air and charges it with electricity, then slams it down to create an electric explosion.
- A vertical mace slam combined with a flying Fury Attack. Run in the opposite direction if you spot this.
- Energy vortex attack where he slams his mace into the ground. You can get away from the area to avoid damage.
The key to getting to the next phase is to deal in some heavy combos and attacks while avoiding his special attacks altogether.
Phase 2
Simon sheds his cloak to reveal a ghost in his back and a new arm. With this new apparition, he is now equipped with more spells and projectiles that inflict Disruption, an effect that instantly kills. Thankfully, his moves are almost the same as Phase 1, but he has more speed and is now more aggressive.
He now has dash attacks and leaping attacks which have a huge range, so don’t bother running. Your best bet is to block and dodge, so hopefully, you’ve practiced enough that you’re good at it.
As we’ve mentioned, his ghost equips more spells and projectiles, which means he has more magic attacks. Since these attacks inflict Disruption, be sure to equip as much Disruption resistance as you can. Here are some attacks that the ghost could use:
- Throws out floating fireballs in your direction. These fireballs will come for you twice, so if you evade the first time, it will come back one more time.
- Lifting its hand in the air and charging a fireball in the sky, which releases projectiles that will fly at you.
- When Manus does a strafing dash, the ghost will unleash magic blasts that fly at you.
- Charging energy in its hand and slamming it to the ground where a pillar of energy will strike you from the sky. This happens about three times before it ends.
- Charging a light in its hand and throwing out magic bolts.
- Swinging its hand and summoning a wide air wave that runs across the ground. Dash through it to avoid damage.
- Charging a blue light in its hand, Manus lifts his mace into the air and lets out a burst of energy. A vortex will appear on the field, avoid the center as a giant hand will come down to touch it. This results in a huge explosion.
Now, similar to Laxasia’s fight, if you can at least get his health down to half, you can activate the Perfect Guard grindstone to help build a stagger against Manus. To get to this point, just keep watching his combos and hitting him when it ends. Try to block rather than run where possible, as it will be easier to attack him right away.
25. Nameless Puppet

Location: Arche Abbey
Reward: Nameless Puppet’s Ergo
Trophy: The First Puppet
Things to focus on:
- Very fast with good range coverage, but overall, they are predictable
- Has a couple of “rest” moments where you can go on the offensive
- Guarding during his second phase is highly recommended
Just when you think it’s over, you get confronted with the true final boss to beat all Lies of P bosses. Geppetto’s messed up humanoid puppet creation. Most of his attacks are slash combos or dashing attacks, nothing too complicated or outright flashy. But his range is quite far, and his movements are fast.
Phase 1
Rather than your typical one stance to look out for, Nameless Puppet has two:
- The sword resting on his shoulder
- The sword is at his side and pointing to the ground.
These both mean that his combo has ended, and you can go in for an attack or two.
For his fight, we would recommend you wait out his attacks and stay out of his short-range attacks. Continue to dash in and out with heavy attacks. Try to Perfect Guard or block against his attacks if you do find yourself caught.
A potential issue is he can use Pulse Charges similar to yours. This means that he can also get some health back during the fight. But if all things go well, you should be able to get at least one stagger before the next phase.
Phase 2
Here, Gepetto loses his control of the Nameless Puppet, resulting in a stronger and more aggressive attack pattern. He somehow gets faster, with bigger damage, wider reach, and longer combos. This guy will chase you down continuously and hit you with multi-combos, so Perfect Guard would be best utilized here. If you guard against him efficiently, you can stagger him more easily.
Most of what you did in Phase 1 works here as well, and it is important to note that his attacks typically land right in front of him. Hence, if you’re thinking of strafing or dodging him to the side, he will miss you. Again, running away is still a solid option if you’re not a fan of blocking and guarding.
Some attacks you might want to look out for include:
- A dash and double slash, which is part of his Fury Attack
- A long-range thrust, noted by a red flash before he comes right at you.
- A dash and swing, then leap and fall right on top of you
- A thrust attack that fires off a long laser
- A slam attack that spawns pillars of energy that rush at you
Most of his attacks can be side-stepped or avoided, thankfully. Though, some of it must be perfectly timed. You could bring along the Perfect Guard grindstone as well as the Aegis Legion Arm that will help you block attacks and create more distance. When you stagger him and have a chance to use Fatal Attack, do note that he has a big counterattack to damage you further.
As the credits roll and you have reached ultimate satisfaction, do remember to let us know if this guide was useful to you! If you’re looking for more, we do have this Lies of P Weapons and Outfits list that you may be interested in.