In your lifetime, did you ever think while playing a game you’d give serious thought to how to have the best sprinkler layout on your farm? Fortunately for us, Stardew Valley gave us the opportunity to ponder that very question, and make it matter something fierce. Sprinklers free up so much of your day and conserve vast amounts of energy, so let’s discover how you can best implement this system for your farm.
What is the Best Sprinkler Layout in Stardew Valley?
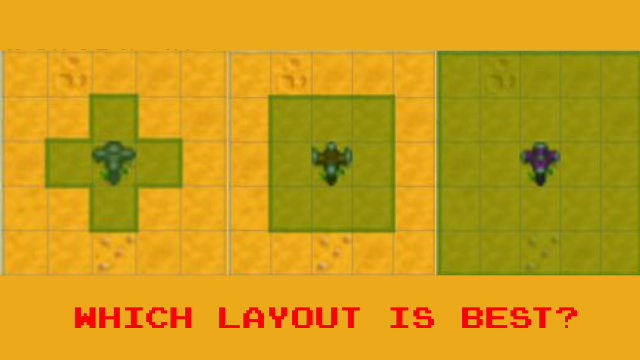
For this guide, we are going to simply skip the basic sprinkler altogether. As an early-game item, the Copper and Iron bars it takes to craft are much better suited for other purposes. The payoff of watering merely four adjacent tiles compared to the resource cost really isn’t worth it. Even more, the Copper Watering Can is able to water three tiles at once. It’s best to work on getting your farming level up to six to unlock the Quality Sprinkler. Mind you, if you’re trying to reach this level quickly, then implementing Basic Sprinklers might be for you. However, we will concentrate on the best sprinkler layout after you’ve got the Quality Sprinkler. You’ll likely not want to stick with these once you can craft the others.
Quality Sprinkler

By the time you reach Farming Level 6, you should have plenty of resources at hand from adventuring into the mines. This is where your farming operation can really start to expand. The Quality Sprinkler layout will give you a nice tight grid of crops, and can be made from one Iron Bar, one Gold Bar, and one Refined Quartz. This item waters the adjacent eight tiles around it. As you can see in the picture above (borrowed from our other, handy guide on the perfect greenhouse), this allows for a very appealing grid and makes for easy harvesting when the time comes. This sprinkler layout is fantastic for easy, mid-game progress. A lot of players swear by this sprinkler layout even later in the game. However, we’re here to go big.
Iridium Sprinkler

The Iridium Sprinkler changes the crop game entirely. With these, you are a farming powerhouse. Crafting with a Gold Bar, an Iridium Bar, and a Battery Pack, you get a 5×5 field of watering goodness. As you can see in the photo above, just a few of these go a very long way. Come harvest time, it may take longer to collect your haul, but the yield is worth it.
As you get into the late game, you can actually improve upon this already-great sprinkler layout, and is easily the best way to foster a monster crop. If you’ve done challenges in Mr. Qi’s Walnut Room, you’ll have been rewarded with Qi Gems. For 20 of these Gems, you can purchase a set of four Pressure Nozzles. Fitting these onto your sprinkler adds a square of range in each direction.
This means for your Iridium Sprinklers, you get a whopping 7×7 watering range. With just four of these boosted Sprinklers, you get 192 tiles of work-free, watered farmland every day. This is more than enough to provide large hauls of sellable goods. Granted, by this stage in the game, you may not need the money anymore. That being said, it still makes for an impressive accomplishment and will satisfy those who like massive harvests.
Didn’t get enough out of those big yields? Interested in other Stardew Valley guides? We got plenty!
- How Do I Get Large Milk and Eggs?
- Where Can I Find Purple Mushrooms?
- Is The Preserves Jar or Keg better?